Saturday, May 13, 2017

Galaxy S6 USB port working intermittently other charging power issues

S6 USB port
For those who are regulars in our site, this post may appear educational rather than a source of technical knowledge on how to fix power- and charging-related issues on a #GalaxyS6. Well, educating Android users is exactly our objective every time we publish a post like this one. Android power issues, particularly devices that won’t power on, are caused by faulty hardware and no software troubleshooting can fix them. Hardware problems are best done by people who do them for a living rather than by “enlightened” Android users.
These are specific topics discussed in this post:
  1. Galaxy S6 USB port working intermittently
  2. Galaxy S6 won’t power on
  3. Galaxy S6 stops working after flashing
  4. Galaxy S6 charging port overheats when charging
  5. Galaxy S6 won’t turn on after an auto-update
  6. Ca n files from a Galaxy S6 that won’t turn be recovered?
If you are looking for solutions to your own #Android issue, you can contact us by using the link provided at the bottom of this page.

PROBLEM #1: GALAXY S6 USB PORT WORKING INTERMITTENTLY

Sometime over the past month, my USB port started responding intermittently. Have no idea what gets it in this ‘bad’ state as I’ve done nothing out of the ordinary. One day it will work, the other it won’t. I’ve ruled out cord and charge â€" tried brand new (came with phone) and cord works just fine on another (older) Galaxy device. This is not related to just charging, when it’s in this broken state, there is no USB recognized by my PC. The phone is only 3 months old, so yes, I can get it covered under warranty. Just frustrating as when it works, it works fine. Wondering if it’s related to the recent 5.1.1 upgrade in early Dec? 
Prior to this (or some other event), I used to use my USB interface daily for file transfers. Now I have to rely on slower Bluetooth file transfers. Charging always works wirelessly, and when the USB port works for PC interfacing, so does charging. Of course, when I stopped into a VZW store, all was working. Came home and still worked over the past weekend. Magically, not working again.  I’ve booted into safe mode when it’s in this state and it’s still bad.  Since you can’t pull the battery on the S6, I powered down for a good hour and powered up â€" still no good.  Even tried wiping system cache â€" no joy.  Only thing I have not tried is a factory reset as I don’t want to have to push my apps back and rearrange my home pages again. But if it comes down to getting it covered, I’m sure that will have to be don e first â€" but given the intermittent aspect, who’s to say it won’t fail; even if it does work after a factory reset? Just very odd given how I’ve never had an issue for the first 2 months of ownership. Gremlins? â€" Rob
Solution: Hi Rob. An Android device’s USB port like the one on your S6 is managed by your phone’s operating system. How it functions (either in USB Accessory Mode or USB Host Mode) is also governed by the operating system. Switching betw een these functions happens in the background, usually, flawlessly. Sometimes, the switch does not go as intended though due to  a number of reasons including bad third party apps, corrupted operating system, and bad hardware, to mention a few. This is the reason why the port may appear “dead”. Presuming there’s no hardware issue involved (since the phone is only three months old), the reason for your trouble should only be coming from the phone’s OS. We recommend that you go ahead with factory reset if you have the time to fix the issue. If the problem returns after a factory reset, you can assume that a hardware problem may be causing it. In that case, you’ll be better off getting the phone replaced.
For reference, here are the steps on how to perform a factory reset on an S6:
  • Turn off your Samsung Galaxy S6 Edge.
  • Press and hold the Volume Up, Home and Power keys together.
  • When the device powers on and displays ‘Power on logo’, release all keys and the Android icon will appear on the screen.
  • Wait until the Android Recovery Screen appears after a bout 30 seconds.
  • Using the Volume Down key, highlight the option, ‘wipe data/factory reset’ and press the Power key to select it.
  • Press the Volume Down button again until the option ‘Yes â€" delete all user data’ is highlighted and then press the Power key to select it.
  • After the reset is complete, highlight ‘Reboot system now’ and hit the Power key to restart the phone.

PROBLEM #2: GALAXY S6 WON’T POWER ON

My phone was working completely fine, perhaps getting a bit hot, especially whilst charging but nothing to worry me. I was driving with my music playing one day, the phone had around 70% charge and just switched off, no shut down procedure, just went black. I tried charging it, nothing happens. I’ve held down the power button for longer than 5 minutes, tried all the reset combinations… Nothing. i’m worried that either the battery or the motherboard has gone bad. Thanks very much! â€" Cal
Solution: Hi Cal. If the phone no longer shows signs of booting up even when connected to a charger, the best thing that you can do is to have a professional check the hardware status. There’s just nothing that you can do on your end at this time, unless you have electronics knowledge and wants to diagnose the issue yourself. If the phone is still under warranty, make sure to bring it to a Samsung store for repair or replacement.
If you want to bring it to Samsung or your wireless carrier store, do not attempt to open the phone yourself as this might void the warranty!

PROBLEM #3: GALAXY S6 STOPS WORKING AFTER FLASHING

Just so you know: I’m a beginner to Android. I tried to flash a ROM for the first time, actually, second time. First time i flashed a rom it worked normally, second time i did it i was stuck in a boot loop. i still sort of am. I tried to do a factory reset and everything, it’s still in a bootloop.
Somewhere i had read that if i pressed the volume down button with the power and home button (the button on the bottom) if i pressed those at the same time for like 10 seconds something would pop up, and i could just press cancel (restart the phone). I did that, but then it said something about Smart Switch. i then downloaded smar t switch to use that, but it says that my device isn’t supported. As I’m writing this i tried to go back to recovery mode (the volume down button with the power and home button), but know it doesn’t start at all, it’s all black. â€" Emre
Solution: Hi Emre. There are only two effective ways to fix bootloop issue. One is by booting the phone in recovery mode (Volume Up, Home and Power keys) and doing a factory reset. The other method is by booting in Download (Odi n) mode (Power, Volume Down, and Home keys) and flashing a stock ROM. Both of these methods require the phone to turn on. If your device no longer powers on at this time, try to charge it for at least 30 minutes before attempting any of the  said methods. Otherwise, have the phone checked for hardware issue.

PROBLEM #4: GALAXY S6 CHARGING PORT OVERHEATS WHEN CHARGING

When charger is plugged in, it shows that battery indicator is charging but actually it is not charging. Instead of increases %, it decreases. While charging charger port is heating like heater even when I’m not using any apps and the phone.
I paid $670 for this poor device I ever used. Why Samsung built this low quality phone and cheating people?  I’m worried with this phone. Please tell me how can I get rid of this trouble. Main problem is charging. Charger is okay. telling device is charging but after sometime when I looked for it nothing is happening . â€" Dinesh
Solution: Hi Dinesh. If the charging port gets abnormally hot during charging sessions, that’s indicative of a hardware trouble. The phone is basically “leaking” and does not provide enough power to the battery. Your best course of action right now is to have the phone checked by Samsung. If don’t want to risk voiding the warranty, we suggest that you leave the phone as is and bring it to the relevant party so it can be repaired or replaced.

PROBLEM #5: GALAXY S6 WON’T TURN ON AFTER AN AUTO-UPDATE

I have unlocked my home screen to check my weather on the widget that was running on the background when all on a sudden I get reports on my screen showing multiple apps such as Google Maps, YouTube, Google Search Box, Crunchy Roll, the Touch Wiz and other apps crashing. I turn my phone up to restart it in hopes of fixing the issue, and still see multiple apps crashing. Then it turns off by itself. I press the power button to turn it on and then it shows, “Android Upgrading”, then a sentence showing “Optimizing 0 out of 14 apps” show up and when it does finally show up, I have seen that whatever has happened has deleted all of the apps that I used to have on my phone and everything was on default settings. Then it turns off by itself and won’t turn on at all. Can you please help me? â€" Ibtida
Solution: Hi Ibtida. Looks like your phone attempted to auto-update itself but failed. Most of the time, auto-update cases work fine even if the installation of the new firmware fail. The phone simply boots back to its previous state and work normally again. Obviously, yours is totally the opposite experience. The only explanation that we can think of is that the update may have messed up with the boot up process. If you cannot boot the phone normally, consider booting it in recovery mode so that you can clear the cache partition and restart the phone normally. To do that, just follow these steps:
  • Turn off the device.
  • Press and hold the following three buttons at the same time: Volume Up key, Home key, and Power key.
  • When the phone vibrates, release the Power key but continue to press and hold the Volume Up key and the Home key.
  • When the Android System Recovery screen appears, release the Volume Up and Home keys.
  • Press the Volume Down key to highlight ‘wipe cache partition.’
  • Press t he Power key to select.
  • When the wipe cache partition is complete, ‘Reboot system now’ is highlighted.
  • Press the Power key to restart the device.
If wiping the cache partition won’t help in booting the phone normally again, or if you encounter a bootloop issue (wherein the phone simply keeps on restarting in over and over), try to do a factory reset (steps provided above).

PROBLEM #6: CAN FILES FROM A GALAXY S6 THAT WON’T TURN BE RECOVERED?

The phone was working fine, minus a battery that was quickly depleted and not enough free memory to update the operating system.
I noticed that the side button was no longer turning off the screen. After that, all I could get was an occasional vibrate when I try to power the phone back on. I tried several combinations of soft /hard resets using the side button, the home screen button, and the up and down volume buttons. My phone has valuable photos and videos, as well as contacts, that cannot be recovered. Please help!! â€" Richard
Solution: Hi Richard . As much as we would like to help you, it appears that your phone has a hardware issue. We don’t usually provide hardware troubleshooting and diagnostics as they require certain knowledge and skills in a user. Attempting to fix an Android hardware issue is also a risky proposition and doesn’t guarantee a resolution. Just like what we told others above, we recommend that you let a professional handle the issue. Better still, try bringing it to a Samsung store so they can decide if they can power on the phone and/or recover your files.
There’s a big chance that Samsung may not be able to recover the files for you and may decide to simply replace or repair the phone. Either of these procedures require that they wipe the memory so if your photos, videos, or contacts were not backed up in any other device or cloud, they are good as gone.


ENGAGE WITH US

If you are one of the users who encounters a problem with your device, let us know. We offer solutions for Android-related problems for free so if you have an issue with your Android device, simply fill in the short questionnaire in this link and we will try to publish our answers in the next posts. We cannot guarantee a quick response so if your issue is time sensitive, please find another way to resolve your problem. 
When describing your issue, please be as detailed as possible so we can easily pinpoint a relevant solution. If you can, kindly include the exact error messages you are getting to give us an idea where to start. If you have already tried some troubleshooting steps before emailing us, make sure to mention them so we can skip them in our answers.
If you find this post helpful, please help us by spreading the word to your friends. SmartAndroWorld has social network presence as well so you may want to interact with our community in our Facebook and Google+ pages.
Having problems with your phone that won’t turn on?
We can help you troubleshoot. We already published troubleshooting guides for the following devices:

  • Samsung Galaxy S2
  • Samsung Galaxy S3
  • Samsung Galaxy S4
  • Samsung Galaxy S5, Android Lollipop edition
  • Samsung Galaxy S6
  • Samsung Galaxy S6 Edge
  • Samsung Galaxy S6 Edge+
  • Sam sung Galaxy S7
  • Samsung Galaxy S7 Edge
  • Samsung Galaxy Note 2
  • Samsung Galaxy Note 3
  • Samsung Galaxy Note 4 Android Lollipop edition
  • Samsung Galaxy Note 5 

How to connect your Samsung Galaxy S2 to your Laptop PC by Bluetooth

 Bluetooth is one of the great technological advances over the past few years and no modern phone would be complete with out out. Whether you want to connect to another phone or a laptop Bluetooth is one of the best technologies you can use. In this guide we are just going to cover the method in which you connect the phone to a laptop (in this case running Windows 7).

Firstly you will need to turn on Bluetooth on your Samsung Galaxy S2. To do this you need to press "Menu" then "Settings". At the settings menu you need to click on "Wireless and network" and then "Bluetooth settings". This will take you to the screen on the right, at this point put a tick in the "Bluetooth" box to activate the Bluetooth and do a scan of the local area.

When youve located your laptop click on it and youll get a screen similar to the one on the left. At the same time youre laptop will display a screen similar to the on the
right. If the codes correspond with each other click Accept on the phone and "Yes" then "Next" on the laptop. After a few seconds they should pair up and the laptop will install a number of drivers.

This will allow you to do a number of things, most notably play music from the phone through the laptop and move files. If youve downloaded a number of apps you really can add to what you can do and its likel y that there will be a remote control app (though I cant confirm this for sure sadly).

Android Fix Unfortunately app has stopped error

Android-How to fix Unfortunately app has stopped error


Sometimes when your Android processes are using up too much RAM,  or when there is some kind of system incompatibility with the app version, it might abruptly shut down giving you the "Unfortunately app has stopped" error. Some examples of these errors: unfortunately Google Play Serv ices has stopped, Unfortunately Whatsapp has stopped, Unfortunately Launcher has stopped etc. Unfortunately Maps has stopped etc. Some similar errors-"process com.android.settings has stopped unexpectedly, please try again"Unfortunately Chrome has stopped",  Unfortunately settings has stopped" "Unfortunately the process com.google.process.gapps has stopped". Here are some simple tips to help you fix these app has stopped errors:

How to fix unfortunately app has stopped error

Android Solution for Unfortunately app has stopped error
1. Check to see your Google Play Store is up to date. If it has bee n a long time since you were last online, you might want to connect to a WiFi and then let the Play Store update automatically.

2. Clear App Cache and Data: Go to settings >> Apps> All apps>> Scroll to the app that is causing errors>> Clear cache and Data. Try to rerun the app. If it doesnt work follow the steps below.

3. If the error is Google Play Related, follow above step to clear cache and data for "Google Play Store" and "Google Service Framework".

3. Uninstall and reinstall the app. Yes, sometimes a simple re-install can resolve the app has stopped error. Some built-in apps cannot be uninstalled so for those apps simply "uninstall updates".

4. If you have a custom ROM installed, reboot into recovery (CMW) and then clear cache and dalvik cache. Reboot system and your app should now run normally.

5. If you dont have a custom recovery, turn off your Android device and then use Power +  Volume d own button to boot into default system recovery. Wife cache partition and then reboot. Be careful not to wipe data

I hope one of the above methods fixed your "Unfortunately app has stopped"  and "process com.android.settings" errors.

If you are experiencing "com.google.process.gapps has stopped" and "Google Play Services has stopped" error after installing a new ROM or after updating to a newer version of Android like Lollipop 5.0, Read this post: How to fix "com.google.process.gapps has stopped" after updating Android.


Related errors:
unfortunately, the process Google Partner Setup has stopped
unfortunately, Talk has stopped
unfortunately, Google+ has stopped
unfortunately, Titanium Backup has stopped
unfortunately, Calendar has stopped
unfortunately, Astrid tasks has stopped

Friday, May 12, 2017

How to fix Samsung Galaxy S7 “Unfortunately System UI has stopped” erro


  • Read about the possible causes of the “Unfortunately, System UI has stopped error on your #Samsung Galaxy S7 (#GalaxyS7).
  • Learn how to troubleshoot your #Galaxy S7 that keeps showing the error “Unfortunately, #SystemUI has stopped” after an update.
  • What to do if the System UI crashes after installing some apps?
  • Know what the most effective procedure you can use to fix this error.
Galaxy-S7-system-ui-stopped
We received a few complaints from Samsung G alaxy S7 owners regarding the error message “Unfortunately, System UI has stopped.” The System UI is actually an Android service that handles the front-end of the system including launchers, home screens, wallpapers, themes and skins. In Samsung Galaxy S7’s case, the main interface is the Touchwiz, although it doesn’t necessarily mean that when this error pops up, the problem is with Touchwiz.
Continue reading to learn more about this error message as well as its variation “Unfortunately, the process android.system.ui has stopped.” I will guide you on how to thoroughly troubleshoot this problem and I will give you the step-by-step instructions to fix it.

POSSIBLE CAUSES EXPLAINED

  1. Corrupt caches due to recent firmware update. Yes, firmware updates may mess up your phone instead of fixing pre-existing issues and this error message is just one of the problems updates bring.
  2. A third-party launcher is causing the System UI to crash. Let’s face it, there are a lot of free launchers you can download fr om the Play Store but only a few are actually from reputable developers. So, there’s a chance that you have downloaded a launcher that conflicts with the firmware or the System UI service specifically.
  3. Newly download firmware update is corrupt or the update wasn’t successful. If there’s just one file in the firmware that’s corrupt, it would cause a lot of issues. The same thing goes for updates that failed or got interrupted.
  4. The phone suffered from liquid damage affecting some of its components and making the phone act like crazy as the normal firmware-hardware operation gets messed up.
Now that I’ve explained the possible causes of the error “Unfortunately, System UI has stopped,” it’s time we jump into our troubleshooting depending on the situation.

TROUBLESHOOTING “UNFORTUNATELY, SYSTEM UI HAS STOPPED” ERROR

Below are some of the situations that this error maybe triggered. Read on to know how to troubleshoot this problem should you encounter it. I also included few of the complaints we received from our readers that is related to this issue.
Step 1: Verify your phone didn’t suffer from liquid or physical damage
As to the physical damage, it’s obvious if your phone suffered from it because you’d see some scratches and/or cracks on the outside. Any physical force that would cause the inside component to function abnormally should leave a trace outside. So, the first thing you should find is the scratches and cracks.
Your Galaxy S7 also has a Liquid Damage Indicator that will tell you if it got in contact with liquid. Your phone is water-resistant, not waterproof so there’s a big chance water can get into it messed up the electronic components inside.
Remove the SIM card tray, look inside the slot and find the small sticker. If it turned red, pink or purple, then the device suffered from liquid damage. But if it stayed white, then water hasn’t found its way into the phone yet.
If your device started to act abnormally or if the error shows up after it suffered physical and/or liquid damage, then turn off your phone and don’t do anything. Instead, send the phone in for repair immediately. We cannot tell for sure the extent of the liquid damage.
Step 2: If the error came up after a firmware update, then delete the system cache
This procedure is very effective to this error messag e because if it so happened that it started to pop up after an updateâ€"regardless whether it’s a small or a big oneâ€"it is almost certain the system cache got corrupted preventing core services and some pre-installed apps from running smoothly.
At some point, you may have also noticed that the phone started to slow down, random reboots, or freezes from time to time. In other words, if the error “System UI has stopped” comes up, it means the phone is currently undergoing a general performance problem. So, here’s what you need to do:
  1. Turn off your Samsung Galaxy S7.
  2. Press and then hold the Home and Volume UP keys, then press and hold the Power key.
  3. When the Samsung Galaxy S7 shows on the screen, release the Power key but continue holding the Home and Volume Up keys.
  4. When the Android logo shows, you may release both keys and leave the phone be for about 30 to 60 seconds.
  5. Using the Volume Down key, navigate through the options and highlight ‘ wipe cache partition.’
  6. Once highlighted, you may press the Power key to select it.
  7. Now highlight the option ‘Yes’ using the Volume Down key and press the Power button to select it.
  8. Wait until your phone is finished doing the Master Reset. Once completed, highlight ‘Reboot system now’ and press the Power key.
  9. The phone will now reboot longer than usual.
As long as problem is minor, deleting the system cache will fix it, otherwise, you are left with no other choice but to do the next step.
Step 3: If the error is accompanied by some serious firmware issues, then a master reset is necessary.
If deleting the system cache didn’t fix the problem or if aside from the error message there are other issues that affects the general performance of the phone, then they’re signs that you phone needs to be reset to work properly.
Before the reset though, make sure you make a backup of your data and files saved in the phone’s internal storage as they’ll be deleted during the process. After doing all that, follow these steps:
  1. Turn off your Samsung Galaxy S7.
  2. Press and then hold the Home and Volume UP keys, then press and hold the Power key.
NOTEIt doesn’t matter how long you press and hold the Home and Volume Up keys, it won’t aff ect the phone but by the time you press and hold the Power key, that’s when the phone starts to respond.
  1. When the Samsung Galaxy S7 shows on the screen, release the Power key but continue holding the Home and Volume Up keys.
  2. When the Android logo shows, you may release both keys and leave the phone be for about 30 to 60 seconds.
NOTEThe “Installing system update” message may show on the screen for several seconds before displaying the Android system recovery menu. This is just the first phase of the entire process.
  1. Using the Volume Down key, navigate through the options and highlight ‘wipe data / factory reset.’
  2. Once highlighted, you may press the Power key to select it.
  3. Now highlight the option ‘Yes â€" delete all user data’ using the Volume Down key and press the Power button to select it.
  4. Wait until your phone is finished doing the Master Reset. Once completed, highlight ‘Reboot system now’ and press the Power key.
  5. The phone will now reboot longer than usual.
Step 4: If all else fails, the firmware has to be reflashed or find a technician to do it for you.
This is the worst case scenario and if you can reach this point, it means that the “System UI has stopped” error isn’t just because of a minor firmware issue. The new firmware may need to be reflashed to your phone or reinstalled to make it stable.
Fortunately, manually flashing a firmware on any Galaxy device has been made easy using the Odin flashing tool. But the thing is, if you hav en’t done it before, it’s most likely you don’t understand how it works. In this case, just try to find a technician that will do it for you as the process is also risky. You might end up soft-bricking your phone.

PROBLEMS FROM OUR READERS

Below are some of the complaints we received from our readers that’s related to this issue. Read on to learn how the error occurred to them and what needs to be done to fix it.
Q: “There was an update that my carrier rolled out recently for the Galaxy S7. It was a small update and got downloaded easily on my phone. But however small an update is if it’s faulty, then it will surely a lot of issues and that’s what happened to me. After the update, the error message ‘Unfortunately, System UI has stopped’ started to show up and the phone’s performance got worse. What can I do?”
A: You need to follow the entire troubleshooting procedure above to verify further what the cause is and how to fix it.
Q: “I tried to use a third-party launcher and actually it works really good. I hate the Touchwiz that came with the phone but the thing is, there’s an error that keeps popping up. It’s saying about the System UI that stopped working. Have you guys encountered this issue before? By the way, I have a Galaxy S7 and it’s new so I’m a bit frustrated with it over this error. Help me guys, please.”
A: I don’t know what kind of launcher you installed but it’s causing conflicts within the firmware. To verify further, try to boot your phone in safe mode and you’ll find out the error won’t pop up:
  1. Press and hold the Power key.
  2. As soon as you can see the ‘Samsung Galaxy S7’ on the screen, release the Power key and immediately hold the Volume Down key.
  3. Continue holding the Volume Down button until the device finishes rebooting.
  4. You may release it when you can see ‘Safe mode’ in the bottom left corner of the screen.
It proves that the third-party launcher is the one triggering it. Try wiping its cache and data first, then boot in normal mode to see if the error will show up, if so, then you h ave no other option but to uninstall it.
  1. From the Home screen, tap the Apps icon.
  2. Find and tap on Settings.
  3. Touch Applications and then Application manager.
  4. Swipe to ALL tab.
  5. F ind and touch the launcher you just installed.
  6. Touch the Force Close button first.
  7. Then, tap Storage.
  8. Tap Clear cache and then Clear data, Delete.
I hope this helps.

How To Fix Common HTC One M8 Problems and Errors Part 5

How To Fix Common HTC One M8 Problems and Errors [Part 5]


Part 4
you may also contact us through our Facebook and Google+ social media accounts.
M8 Headphone Jack Stopped Working
ProblemI pulled out my earbuds from the phone. I didn’t think much of it, but the headphone symbol remained lit on the phone. I rebooted. After that put the headphones into the jack and there is no headphone symbol lighting up, and the headphone have no sound. Playing a song or vid comes through the speakers. I plugged the buds into another player and they seem to work fine. 1) plugging headset into the jack and the jack symbol does not appear on the phone. 2) with the headset plugged in (albeit without the symbol appearing) and sound comes out of the speakers. Anyone else having this issue?
Solution: This might just be caused by dirt getting stuck in the headphone jack. Try cleaning it carefully using a toothpick then insert your earbuds. If the issue is caused by dirt it should be working fine by now. If it still doesn’t work then you might want to do a master reset on your device. This allows your device to revert back to its original state when you turned it on for the first time. Be aware that your data will be lost in this process so make a backup first.
Master reset from settings
  • Go to Settings, and then tap Backup & reset.
  • Tap Reset phone.
  • If you want to delete media, documents, and other data from the phone storage, select Erase all data.
  • To also delete media and other data from your storage card, select Erase SD card.
  • Tap OK.
Master reset using hardware buttons (Fast boot option in Settings > Power must not be selected.)
  • Turn off device
  • Press and hold the VOLUME DOWN button, and then press and hold the POWER button.
  • Wait for the screen with the three Android images to appear, and then release the POWER and VOLUME DOWN buttons.
  • Press VOLUME DOWN to select FACTORY RESET, and then press the POWER button.
M8 Does Not Turn On
P roblemMy HTC One died suddenly on me as well.  The last time it worked, i plugged it in to charge right before going to bed as I always did. When I woke, the phone was off. I tried turning it on, but nothing happened. The charging indicator doesn’t turn on either. I attempted a hard reboot of the device by holding power and down on the volume button, but that didn’t work either. By this point, I had the phone for a little over a year and I knew I wasn’t going to be able to replace it for free, so I bought a used phone online. However I am now wondering if there is anyway to see if I can have this phone repair, even if I have to pay for the repair myself. Any suggestions?
Solution: Have you tried using a different wall charger on your device? There are cases when a phone has fully drained and when charged using a faulty charger it will not turn on. Try using a different charger that is known to work and leave your device charging for 30 minutes. If you still can’t turn it on then the problem may be in the battery or the device itself. Replacing the battery though is difficult so your best option right now is to bring your device to an authorized service center for proper checking.
M8 Blurry Camera Photos
ProblemThe camera takes blurry pictures, regardless of the distance, light, angle, etc. Everything is blurry. I have had the camera since May, and it just started about 2 days ago. Help!
Solution: If you have another camera app installed in your device try using it and see if the photos taken are still blurry. If not then what you need to do is clear the cache and data of your Camera app by going to Settings- Apps â€" Go to All tab- find the Camera app and clear cache and data. If the photos taken by your other camera app are still blurry then one possible reason for this is that the camera lens coating has been scratched or damaged. What you need to do is just take a piece of cloth and wipe the coating away from the lens. Try using a cotton bud with a little toothpaste on it to clean away the coating. Once the lens is clear your photos will no longer be blurry.
M8 Microphone Not Working
Problem: I bought my M8 a couple months ago and everything was great until two months ago, one of my friend told me that she couldn’t hear what I was saying. It was a complete silence. I asked different people to call me, and the problem is the same. The thing is, I can still hear everyone but no one can hear me unless I yell at the speakerphone, or use the headset to talk. I tried to restart, then reset the phone, then update the newest version, blow in the bottom mic, and clean the hole, but nothing works. It’s really got me frustrated. I mean whenever someone call me, I gotta find a headset to plug in, and by the time I do it, it takes too long and they hang up. So what should I do next?
Solution: If you already updated your software, did a master reset, and clean the bottom mic then the problem may already be with the hardware. The microphone of your device may already be faulty and will need to be replaced. Your best option is to bring your device to an authorized service center and have it repaired.
M8 SMS Sending Issue
ProblemThis started a few days ago. Sometimes I’ll send a text and it will have the little “pending” symbol next to it. That never goes away. But then I’ll get a reply to the text. So it is obviously being sent. However, now I constantly wonder if my texts are really sent or if they’re stuck truly pending.Solution: What you need to do first is to check if you are using the latest software update for your device. If there are updates then I suggest you download them and install them. These updates usually contains improvements and fixes that may help resolve the issue.
If you are using a non-native SMS app then I suggest you switch back to the default SMS application and try sending a message with it. If possible uninstall other SMS apps. If the issue still exists then delete all the messages in your device. Make sure to make a copy of all the important ones first. Next delete the cache and data of the default messaging app.
  • From the Setting menu, touch Apps or Application Manager.
  • Verify the All tab is selected.
  • Find and touch the Messaging application.
  • Touch Clear Cache and Clear Data.
Your issue should be resolved after this.
M8 Not Able To Connect To Mobile Data
ProblemI recently purchased a new unlocked HTC One on Amazon.  Phone is awesome and works well.  I have a new micro-SIM installed.  I am able to get Wi-Fi connection.  I am not able to get my data t o work when I am not around a Wi-Fi signal.  I get 500mb free through my T-Mobile plan.  The weird thing is that I can get data to work on my old HTC G2, but not on my new HTC One.  What is the difference, I think I am missing something here?
Solution: Since this is an unlocked device the mobile network settings for T-Mobile may not be set yet. This is probably why you can connect to Wi-Fi but not to mobile data. Check and see if you have the correct APN setting and do the necessary adjustments.
  • Name: T-MOBILE
  • APN: fast.tmobile.com
  • Proxy: <Leave in Blank>
  • Port: <Leave in Blank>
  • Username: <Leave in Blank>
  • Password: <Leave in Blank>
  • Server: <Leave in Blank>
  • MMSC: http://mms.msg.eng.t-mobile.com/mms/wapenc
  • MMS proxy: <Leave in Blank>
  • MMS port: <Leave in Blank>
  • MCC: 310
  • MNC: 260
  • Authentication type: <Leave in Blank>
  • APN type: default,supl,mms
  • APN Protocol: Leave it to the Default one
M8 Pictures Disappearing
Problem: Hi, I have the htc one m8, stock rom. It’s great phone and everything seems okay except sometimes photos and videos I take are there and then when I go to view them again in the gallery, in their place is an exclamation mark inside a triangle and I can’t open them. This doesn’t happen to all photos and videos just some and to be honest its quite annoying, I took some photos from my mum’s birthday party and now they appear to be gone. The photos save automatically to my external sd card. When I connect the phone to my PC these photos and videos won’t display or open. But they have different file sizes so I guess they’re still there if that makes any sense. Any help here will be greatly appreciated.
Solution: If your photos or videos are missing in your SD card then it is a sign that it is corrupt. What you need to do is make a backup the contents of your SD card to your PC. You then have two choices, you can format the SD card and try to use it again. There will be a possibility that the problem will return. The other option is to get a new SD card.
M8 Volume Button Loose
ProblemI just bought a HTC ONE M8 and when i get home, i notice the volume button is loose, what can i do? is a $700 Phone and other phone like that are no loose like my htc m8. im going today to the store to see if they replace my phone. Can you suggest any other way to fix this?
Solution: The volume button on your phone should not be loose. Since this is newly purchased then you can have it easily replaced with another unit. Just be sure to check everything out with the new unit and see if there are any defects.
M8 Intermittent Texting Issue
ProblemI’ve had the phone (M8) for 3 weeks.  About 1 in 20 texts never go out and I have to send them again.  I recently di scovered that they are somehow stuck and when I reboot the phone they all go out at once, which totally confuses the recipients. I’m also seeing them go out in the wrong order if I send two or more in a row.  The first one will lag for several minutes while the second one goes out within seconds, while a third may never go out at all.  This also confuses the recipients. Any suggestions on what I can try to determine whether this is my phone, a software issue or a carrier issue?  I have a strong LTE signal, and as mentioned, the problem is intermittent in a short span of time.  I’ve tried different SMS apps â€" all have the same problem, so I’m back to using the default texting app.  Not sure if that’s HTC’s or Android.
Solution: What you need to do first is to check if your device is running on the latest system software. Next, uninstall any third-party SMS app and use only the default messaging app. Do a soft reset of your device.
  • Press and hold the POWER button, and then tap Restart.
  • When asked to confirm, tap Restart.
Verify if the problem still exists.
If it does then determine if it occurs in a particular location or if it occurs anywhere you are. If this issue only occurs in your home but not at work then it might be a network related issue. I suggest calling your network provider to verify the coverage in your area. You could also try to insert another SIM in your device to verify if this is a SIM related issue.
One final step that needs to be done is a master reset. This reverts your device to its ori ginal state when you first turned it on. Be aware that data will be lost in this process so it is recommended that you make a backup first.
Here’s the list of what will be removed when a master reset is done
  • Your Google Account
  • All accounts you’ve added in Settings > Accounts & sync and the data associated wi th these accounts
  • Personal data that you’ve created or synced to the phone such as your profile, contacts, messages, email, calendar events, and more
  • System and application data and settings
  • Downloaded apps
  • Files such as your music, photo
To do a master reset
  • Go to Settings, and then tap Backup & reset.
  • Tap Reset phone.
  • If you want to delete media, documents, and other data from the phone storage, select Erase all data.
  • To also delete media and other data from your storage card, select Erase SD card.
  • Tap OK.


Samsung Galaxy S5 Text Messaging App Lags

Samsung Galaxy S5 Text Messaging App Lags

The #Samsung Galaxy #S5 is a former flagship model released by the South Korean giant in the second quarter of 2014. It’s hardware is still considered top of the line today and should be able to provide a smooth user experience. With the help of its Snapdragon 801  processor combined with 2GB of RAM, demanding applications such as games are sure to work without any issues. Several of our readers however are experiencing issues with this device that affects its performance. This is what we will be discussing today as we tackle the Galaxy s5 getting slower, lags really bad & other related problems.
Samsung Galaxy S5
If you own a Samsung Galaxy S5  or any other Android device for that matter then feel free to contact us using this FB Page. We will be more than happy to assist you with any concern that you may have with your device. This is a free service we are offering with no strings attached. We however ask that when you do contact us try to be as detailed as possible so that an accurate assessment can be made and the correct solution can be given.  

You may also reach us at our Facebook and Google+ social media accounts.
S5 Text Messaging App Lags
Problem: The default text messaging app on my phone lags really badly when I type. It freezes when i type and then when it catches up it repeats what I typed multiple times. There are times when I find that I’m not receiving all my messages or the receiver of my texts will get my message a week later. The only time I have typing issues is when I’m in my messages app.
Solution: If the problem is isolated to the messaging app alone then try to clear the cache and data of this app from the appli cation manager. This will clear out the temporary data of the app which could be causing this problem.
You should also check if a third party app installed in your phone is causing the problem by stating the device in Safe Mode. While in this mode only the pre-installed apps are allowed to run. If the issue does not occur in this mode then it could be caused by an app. Find out what app this is and uninstall it.
I also highly recommend that you wipe the cache partition of your phone from the recovery mode.

Thursday, May 11, 2017

Poweramp cant find music on microSD card external storage

Poweramp is a great Android music player and I haven’t had any issue with it but recently some users have reported that their Poweramp won’t find music saved on SD card or external storage even when doing a rescan. When you search for the music files they do not show up. The reason why Poweramp can’t recognize/scan music files/folder stored in microSD card is because you havent selected the music folders in the external storage in the "Folders and library" settings. In many music player apps all folders on your device are selected by default so that it can scan everything. However Poweramp scans the music folder in your device storage by default and then gives you the choice to select the music files/folders in other locations. This enables Poweramp to quickly scan for any new music files only in the selected folders. Here is how you can scan and play audio files sav ed on micro SD card, external storage or any location in Poweramp music player:


How to fix Poweramp won’t scan music files/folders on microSD

  • Go to settings
  • Select “Folders and Library”
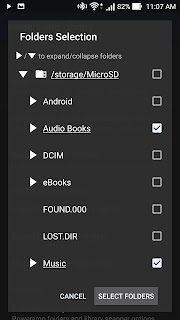
  • Tap on “Music Folders”
  • Scroll down to find this location “storage/MicroSD” (or any location in external storage)
  • Now select the music folders in your SDcard or any location that you want Poweramp to scan

Poweramp Settings

Selecting music folders to scan on  Poweramp


Now Poweramp will read all the music files in your selected folders in the SDCard. You can search for your music files or simply play it from the “recently added” section of your music library.

You can also enable “Auto-Find” from the Folders and library settings, but that will detect all music files (ringtones, game sound, recorded audio etc) in your device. You can then customize the “Music Folders” setting to select only some preferred folders.