Wednesday, May 31, 2017

What you need to do to prevent your Samsung Galaxy Note 7 from exploding or catching fire Safety Tip

.


What you need to do to prevent your Samsung Galaxy

 Note 7 from expl oding or catching fire [Safety Tip]

The new #Samsung Galaxy Note 7 (#Note7) has an enormous battery but there’s a chance it will explode or set your phone ablaze. The fact is Samsung already issued an official statement confirming there were already 35 reported cases wherein the the units either exploded or caught fire during or after charging
Galaxy-Note-7-catching-fire
The company has yet to identify which batch is faulty but until then, owners can never be sure the safety of their units. While 35 is quite a small number out of 2.5 million units shipped worldwide, you can never really rule out the possibility that you may wake up one day with your unit smoking hot.
Then, there’s the possibility that the unit may explode or catch fire while you’re sleeping or while you’re holding it and may cause more serious safety hazards. There is something you can do to prevent it from happening…

TIP #1: CLOSELY OBSERVE YOUR PHONE WHILE CHARGING

Reports suggest that Note7 may explode or catch fire during or after charging. Samsung said to investigate on the problem to know the reason why it happens but we can’t wait for the results of the investigation considering the fact that it’s your own safety that’s at stake here.
Here’s a simple logic; phones develop heat while charging, too much heat may cause explosion or fire. If you can just prevent the phone from developing too much heat while charging, then you can prevent those situations. That being said, there are things you can do to keep heat in check during charge:
  • Turn off your phone if you want to fast charge or planning to leave it plugged in while you run your errands.
  • Don’t use the phone or play games while it’s plugged in.
  • Place it in a cool (not hot) place during charge.
  • Take off those third-party cases.
  • Use the original charger and cable.
I understand that doing these things mean you’re walking an extra mile when you shouldn’t be considering you paid several hundred dollars for a premium phone. It should work without a hitch but there are things that even manufacturers can’t control and this is one of them.
So, while charging, try to feel the phone with your fingers to know if it’s heating up too much. Normally, the phone will heat up while plugged in but not to the point where you feel uncomfortable touching it. So, if this is case, unplug the charger immediately and if your phone is powered on, turn it off. Don’t attempt to charge your phone again.

TIP #2: HAVE THE PHONE REPLACED

When it comes to safety, there should never be any compromise. If the phone is heating up while charging, bring the phone back to the store and have it replaced. Here in the U.S., the Big Four already advised their subscribers who own the new Note 7, or at least, you rest assured your phone will be replaced no questions asked.

AT&TSamsung has notified us that they have identified a battery cell issue in certain Galaxy Note7s. They have asked all retailers, including AT&T, to stop selling the device. We are in the process of determining the exchange process for our customers and how they can replace their current Note7 as quickly as possible. We will have more information later today.
Verizon Wirel essSamsung has notified us that they have identified a battery cell issue in certain Galaxy Note7s. They have asked all retailers, including AT&T, to stop selling the device. We are in the process of determining the exchange process for our customers and how they can replace their current Note7 as quickly as possible. We will have more information later today.
T-MobileStarting immediately, customers who are concerned about using the Note 7 can return the device to T-Mobile for a full, complete refund. They’ll get a full refund of anything paid for the device and any Note7 accessories. We’ll waive any restocking charges and shipping fees, and customers can keep the free Netflix subscription they received with purchase during pre-order. 
Customers can visit their local T-Mobile store where they bought the device or call 611 or 1-800-937-8997 to do this, and they can then use their refund to choose a similar devi ce or any device in T-Moble’s stores, including a new Note7 replacement which we expect to be available in the next two weeks.
SprintSprint has suspended sales of Samsung Galaxy Note7 immediately following Samsung’s announcement to discontinue sales of the device globally.  
We are working closely with Samsung to ensure those customers who already have purchased the device are taken care of. For those customers that previously purchased the Note 7 we will offer them a similar device until the issue is resolved. Customers should go to a nearby Sprint store to exchange their Note 7 device.
The bottom line is that you don’t need to take any chances when it comes to this matter especially that your safety is at stake here. Don’t wait for your device to actually catch fire before you something about it. Wh ile we understand it’s a hassle and we don’t know yet if you will be provided with a new device immediately considering Samsung is still investigating whether it’s just an issue with some devices that belong to the same batch or not.

How do I copy and paste text from the web with a Samsung Galaxy S2

 A lot of people on the internet have been asking how to copy bits of text from websites on to their Samsung Galaxy S2 cell phone. The funny thing is that the in-built browsers makes copying much more difficult than using the (much better) alternative Opera Mini browser.

If you wish to use the default browser you need to hold the screen where a word is. You will notice that you get a magnifying glass type of thing over the screen, if you release whilst on the word youll get an option like there is s hown on the screen shot to the right. If you stretch the marks apart you can copy more text though this method is somewhat slow as it seems to take longer than it should to drag for multiple words.
 Using opera mini you start with the same concept, press and hold on the screen and when you get a menu screen like the one shown on the image to the left you need to choose the "Select Text" option. From here you can select whole pages by dragging your finger along the text and this will highlight it blue. As soon as you release your
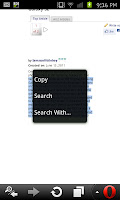
finger from the screen you will get a new menu come up with an option to " Copy". You can then do plenty with what youve copied, whether you want to use it to post on a website forums or an e-mail or even a text.

To 
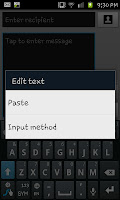
paste your copied text you need to hold your finger in a "message box" such as the box you would enter a text message or an e-mail in. When you hold your finger on the screen you will see a pop up menu (see the screen capture to the left) with the option to paste. As soon as you select paste you will notice all the text you selected appears in the box.

To the right here you can see an excerpt that was copied into a text message using the Opera mini browser to copy and the default messaging app to paste. The actual amount of te xt you can copy and paste in this method does seem to be incredibly large and Ive yet to stumble on the limit, though it would be fair to assume that if you wanted to copy and paste a huge amount the Samsung Galaxy S2 may have its limits or take a moment to copy.

This is one of the many times that using Opera Mini is an advantage over using the default browser which has a number of limitations and Id advise downloading either Opera mini or Skyfire for a number of reasons not just this one.

Edit:
Thanks to a comment by Material girl Ive been playing about with this and realised that if you drag the little "quote marks" when using the default browser you can use that to highlight more than just a single world.
Thank you to Material Girl for pointing this out.

The text from the copied screen capture is from:
The Samsung Galaxy S2 review on Helium.com

How to Unbrick Samsung Galaxy Note 3


I downloaded the installation package of the root on the Internet. I want to root my Samsung Note 3. However The result is a disappointment to me. My cell phone is not operating now. With colloquial expression is, my Samsung Note 3 become a brick. How can I fix it?

Android Data Recovery is a Android equipment for the work of the object data recovery software. At present, its Android data extraction feature is compatible with Samsung Galaxy devices. In addition, it has a very high recovery rate. More importantly, it is a variety of data types can be recovered, for example photos, videos, contacts, messages, call logs, and more. You can clearly see the functionality of the software in th e operation interface. Moreover, the software will step by step to remind you how to do. If you still dont understand the software, you can look at the next steps.


How Can I Unbrick My Samsung Galaxy Note 3:

Step 1. First of all, please download the Android Data Recovery to your computer and then run it. At the same time, please use the USB line to connect your phone to your computer.


Step 2. On the left side of the program, there are four items for you to choose. Please click on third "Android data extraction". Then, the left interface of the program is shown in the following figure. Because your mobile phone has bricked, it is not operational, so you should click the blue font “fix my brick phone" on the lower left corner.

< br />Step 3. Next, the program enters the next step, you need to select the contents of the phone which you want to restore and enter the download mode. You just need to follow the words in the picture to operate.

1. Power off the phone.
2. Press and hold Volume "-", "Home" and "Power" button on the phone.
3. Press "Volume +" button to enter download mode.


When you enter the download mode, you need to wait until the program automatically scans your phone.


Step 4. When the program analysis is completely, it will automatically resume download package to repair your phone to the normal state. Your phone will be re root when the recovery package is successfully downloaded. Finally, restart your phone; your phone is back to normal.

                                        &n bsp;
Here you need to pay attention to is, in the whole process you need to keep the connection of the mobile phone and computer is normal.


Related Articles:

How to Unbrick a Samsung Galaxy S3/S4/S5/S6/S6 Edge

How to Fix A Bricked Android Phone

How to Unbrick Samsung Galaxy S6/S6 Edge

How to Fix a Bricked Samsung Galaxy S5

How to Fix Bricked Samsung Galaxy S4

Tuesday, May 30, 2017

Samsung Galaxy J7 Memory Card And Dynamic Memory


Memory CardA special slot for inserting a memory card. Memory cards allow you to expand the phones built-in memory (or in the past these slots have been used to add some missing features such as Wi-Fi connectivity).
Memory cards have different capacities and are u sed to store and transfer files between compatible devices. There are several types of memory cards. The most popular and frequently used by mobile phone manufacturers is microSD; however, up until recently Sony Ericsson exclusively used the Memory Stick Micro (M2) card type developed by Sony.
Memory card slots can have various supported memory card capacities. Depending on the device, card slots can support capacities of up to 2, 4, 8, 16 or even the yet unavailable 32GB.
As manufacturers rarely test their products for compatibility with newer and larger cards that come out after a specific handset is out on the market, whenever it is possible, we try to verify that larger capacity cards run on older phones.
When we confirm that a mobile phone works with a larger capacity memory card than what the manufacturer has advertized, we usually put that down in the phone specs sheet in our database.
That way, when you see the word "verified" in the Card slot field, you will know our reviewing team has personally tested the device for compatibility with the stated capacity and they are compatible even though it may not be officially stated so by the manufacturer.
Still, you should take that information with a pinch of salt, as your mileage with your specific unit may vary.
Dynamic Memory : A way or organizing different types of data in the phones memory. Also referred to as Shared memory.
Dynamic memory means that all types of data are stored in the same memory (there is no separate memory for photos, ringtones etc.).
An advantage of dynamic memory over partitioned memory is that it is more flexible - with partitioned memory, you can fill up the photo memory for example and you wont be able to take any more photos even if other ty pes of memory are free.

How To Fix A Galaxy S3 That Won’t Turn On Troubleshooting Guide

How To Fix A Galaxy S3 That Won’t Turn On [Troubleshooting Guide]

We receive hundreds of emails each week from our readers reportingâ€"many actually complainâ€"about the problems they encountered with thei r phone. In one of the emails, our reader, a Samsung Galaxy S3 owner, said his phone was fully-charged but about an hour later, he found it turned off. The worst part is, he couldn’t power it on.
What happened? Well, even Samsung engineers couldn’t answer that question without performing some troubleshooting procedures.
In this post, we will attempt to troubleshoot the phone exhausting all possible ways to bring it back to life.

TROUBLESHOOTING STEPS

Step 1: Hit the Power button â€" yes, please do. This is the first thing you should do when troubleshooting a problem like this. Don’t just do it once or twice but do it many times just to make sure that there is indeed a problem with the powering on of the phone.
Step 2: Remove the battery and hold the Power button â€" yes, I’m serious. Actually, somebody told me I was a fool when he saw me pull the battery out of his phone and hit the power button. He said, there is no way I can turn the phone on without the battery. That’s true, but we’re not actually trying to power on the phone at this point. Rather, we’re trying to drain electricity stored in electronic components inside the phone. After this, place the battery back and hit the power button again. If the phone stays dead after that, proceed to the next step.
Step 3: Boot to Safe Mode â€" to rule out the possibility of a third-party application preventing the phone from booting up normally, you need to boot it to Safe Mode. It will run on pre-loaded apps and nothing else. So, if it were an app causing the problem, you would know by doing this.
  1. Press and hold the Power button.
  2. Immediately after the Samsung Galaxy S3 screen appears, release the Power button then press and hold the Volume Down key.
  3. The phone would restart and the Safe Mode text will be visible in the lower-left corner of the screen.
Consider yourself lucky if you can go this far. If this is the case, then you can commence the search for the rogue app and uninstall it. Start your search from the most recent installation. The rule of thumb is to disable suspected apps first and attempt to boot normally. The problem has already been fixed at this point.< /div>
In case you cannot boot to Safe Mode, proceed with the next step.
Step 4: Boot to Recovery Mode and wipe cache partition â€" booting to Recovery Mode can be already be considered a desperate measure yet it is not a guarantee you can fix the problem. In fact, there is no guarantee you can even boot to this mode. But try to follow these steps:
  1. Press and hold the Volume Up, Home, and Power buttons.
  2. When the phone vibrates, release the Power button but continue holding the other two until Android System Recovery screen appears.
  3. Use the Volume Down button to highlight ‘wipe cache partition’ and press the Power button to select it.
  4. The phon e will reboot automatically after the cache partition was wiped out.
At this point, if you can’t boot to Recovery Mode no matter how much you tried, then we have already narrowed down the problem. It’s either your battery is totally busted or your phone’s Power switch has a problem.
Step 5: Try a different or new battery â€" borrow from a f riend or just buy a new battery so you can test if it was really the battery that caused the problem. If you bought a new one and you found out it wasn’t the battery, at least, you now have a spare. Of course, make sure the battery is compatible with the Galaxy S3 and make it a point to fully-charge before using it. If your phone powers on after a battery swap, then problem solved.
Step 6: Seek help from a technician â€" in case you’ve tried a different battery and the phone still refuses to turn on, it’s time you brought it back to the store or to a shop where it can be physically check thoroughly. If proven defective by a technician, a replacement unit may be provided for you of it could be repaired. I have a suspicion it’s a Power switch issue especially if the phone don’t respond when you pressed it.
I hope this helps.
Having problems with your phone that won’t turn on?
We can help you troubleshoot. We already published troubleshooting guides for the following devices:
  • Samsung Galaxy S2
  • Samsung Galaxy S3
  • Samsung Galaxy S4
  • Samsung Galaxy S5, Android Lollipop edition
  • Samsung Galaxy S6
  • Samsung Galaxy S6 Edge
  • Samsung Galaxy S6 Edge+
  • Samsung Galaxy Note 2
  • Samsung Galaxy Note 3
  • Samsung Galaxy Note 4
  • Samsung Galaxy Note 5

Samsung Galaxy S6 Screen Is Dark After Getting Wet

Samsung Galaxy S6 Screen Is Dark After Getting Wet
installment of our troubleshooting series where we help our readers troubleshoot the #Samsung Galaxy #S6 issues that they are experiencing. For today’s topic we will tackle the Galaxy S6 screen not turning on issue & other related problems. As we all know, everything that you need to do with the phone has to be accessed through its display. If the display is not working properly then it’s very likely that you will be unable to use your phone. We have selected several of the issues of this nature that have been sent to us recently and have addressed them below.
Samsung Galaxy S6
If you own a Samsung Galaxy S6  or a ny other Android device for that matter then feel free to contact us using this FB Page. We will be more than happy to assist you with any concern that you may have with your device. This is a free service we are offering with no strings attached. We however ask that when you do contact us try to be as detailed as possible so that an accurate assessment can be made and the correct solution can be given.  

You may also reach us at our Facebook  ;and Google+ social media accounts.
S6 Screen Is Dark After Getting Wet
Problem: Dropped in water. Only slightly wet and dried right away.  Vacuumed ports. Turned off immediately. Would turn on but the screen is dark.
Solution: It appears that the display may have been affected by the water. If you phone is still getting notifications and everything seems to work except the display then try to check if a battery pull will solve the issue ( press and hold the power button and volume down button for at least seven seconds). If the problem remains then have your phone checked at an authorized service center.
< /span>

Monday, May 29, 2017

How To Fix Common HTC One M8 Problems and Errors Part 15

How To Fix Common HTC One M8 Problems and Errors [Part 15]

Aside from sending us an email you may also contact us through ourFacebook and Google+ social media accounts.
M8 Issue With Sprint ItsOn App
ProblemHi, I’ve been following your series “How To Fix Common HTC One M8 Problems and Errors.” It’s very informative and helpful. Now it’s my turn to contribute! I have an M8 H/K edition with Sprint. I’ve been experiencing poor battery life and I notice that a system app (I believe put there by Sprint) called “ItsOn” is responsible. On average, I see the app contributing to 40-60% of my battery usage. My questions: What is it and how can I keep it from draining my battery? It does not appear to be easily disabled or uninstalled. Thank you!
Solution: ItsOn is a cloud based platform that allows Sprint to offer personalized experiences to its no contract customers. With this system customers will be able to buy minutes, top-off, and change priorities between mobile services on the fly. All of this can be done on the screen of the phone without the need to call a customer service representa tive.
Although ItsOn is a great platform some owners of the HTC under the Sprint network are experiencing a poor battery life after this app was pushed with the recent update. The carrier is already aware of this issue and will be coming up with a solution soon.
In the meantime, here are some steps you can undertake to resolve this.
Do a factory reset but make sure you backup your data first. Take note that the Fast boot option in Settings > Power must not be selected.
  • Press and hold the VOLUME DOWN button, and then press and hold the POWER button.
  • Wait for the screen with the three Android i mages to appear, and then release the POWER and VOLUME DOWN buttons.
  • Press VOLUME DOWN to select FACTORY RESET, and then press the POWER button.
Other extreme measure that you can take if this issue is really bothering you is to root your phone and either install a previous stock firmware version on your phone or a custom ROM.
I however suggest that you wait for the next software version to be released by Sprint which will hopefully come with a fix for this issue.
M8 Can’t Attach Photos In Facebook Comments
ProblemGood morning, I purchased the HTC One M8 “Harman Kardon” edition. The issue I am having with this phone is when I’m on the Facebook app and a friend posts a picture or what have you, normally you are able to attach a picture from your phone and post it in the comments section. I can’t seem to find an attachment key on this phone in order to attach a picture. Can you please help?
Solution: Normally you should be able to attach a photo on the comment by clicking on the camera icon on the comments section. If this option is not available then this may be an app related issue.
What you should do first is to check if there are any updates available for your Facebook app and install them.
  • Slide the Notifications panel open, and then tap the update notification.
  • The Updates screen opens with the list of application updates to be installed.
  • Tap an item to view its details.
  • When you’re done reviewing the updates, tap Install.
I suggest turning on automatic app updates if it is disabled.
  • From the home screen, tap the All Apps icon.
  • Scroll to and tap Play Store.
  • Tap the Menu icon.
  • Tap Settings.
  • Tap Auto-update apps.
  • To enable automatic application updates, tap Auto-update apps at any time or Auto-update apps over Wi-Fi only.
If you are already using the latest version of the Facebook app but the issue still persists then you should clear the Facebook app cache and data. Take note that you will have to enter the login details of your account again once you run the app.
  • From the home screen, tap the All Apps icon.
  • Scroll to and tap Settings.
  • Scroll to and tap Apps.
  • Swipe to the ALL tab.
  • Scroll to and tap the Facebook application.
  • Scroll to and tap Clear cache.
  • Scroll to and tap Clear data.
  • The application cache and data is now cleared.
M8 Can’t Send MMS
Problem: I read an article on HTC m8 errors and fixes from you, hoping you could help with my problem. I recently purchased an HTC One M8 on eBay, it is unlocked but was originally from Verizon, I changed its sim card to my networks (Claro) sim card. It seems I can make calls just fine, but I can’t send or receive sms or mms messages, they just stay waiting to be sent. I’ve tried rebooting, changing network t o GSM, since I heard it may help, but nothing yet. Also, I have no data plan, my current plan is just a regular one with calls and messages but no data. Please help.
Solution: There are two things needed for you to be able to send an MMS. The first is a a data connection and the second is the correct APN settings. Unlike SMS which is sent over a GSM network, MMS works differently as it is sent over a data connection (GPRS, 3G, or 4G LTE). Since you are not subscribed to any data plan with your current provider then this must be one of the primary reasons why you can’t send an MMS.
Another reason why you can’t send an MMS is that your phone data configuration may still be set for the Verizon network. Try to contact your provider for the correct settings. You my also check the settings manually by following the steps below.
  • Press Main
  • Select Settings
  • Select Wireless and Networks
  • Select Mobile Networks
  • Select Access point Names
  • Delete all APN’s in this section.
  • Press Menu
  • Press New APN
Enter the following settings for general Data
  • Name: PE â€" Claro Web
  • APN: claro.pe
  • Proxy:
  • Port:
  • Username: claro
  • Password: claro
  • Server:
  • MMSC:
  • MMS Proxy:
  • MMS Port:
  • MMS Protocol: WAP 2.0
  • MCC: 716
  • MNC: 10
  • Authentication Type: PAP
  • APN Type: default, supl
Enter the following settings for MMS
  • PXT Messaging MMS:
  • Name: PE â€" Claro MMS
  • APN: mms.claro.pe
  • Proxy:
  • Port:
  • Username: claro
  • Password: claro
  • Server:
  • MMSC: http://claro/servlets/mms
  • MMS Proxy: 192.168.231.30
  • MMS Port: 80
  • MMS Protocol: WAP 2.0
  • MCC: 716
  • MNC: 10
  • Authentication Type: PAP
  • APN Type: mms
Regarding your issue with not being able to send any SMS you may want to verify if the messaging gateway you are using is correct. Contact your network provider regarding this issue.
M8 Can’t Send SMS
ProblemI saw your article on the HTC One m8 and wanted to ask a question. I am having a problem with sending text messages. It doesn’t seem to matter where I am or what I’m doing. The messages do not send or take a very long time to send. I have tried it with 4G and wifi but it doesn’t seem to make a difference. Some days it works just fine and others I cant send a single message. I have tried to reboot the phone and a couple of other suggestions from other people but none of them has fixed the problem. Do you have any suggestions?
Solution: Have you tried using another Sim card in your phone and see if the issue is still present? If you can send text messages fine with the new SIM card then it’s probably an issue with your SIM or the account itself.
Since the issue occurs in no particular area then we can rule out any problems with your network. One other troubleshooting procedure that you can do is to factory reset your phone. Make sure you backup you data first and tun off the Fast Boot option.
  • Press and hold the VOLUME DOWN button, and then press and hold the POWER button.
  • Wait for the screen with the three Android images to appear, and then release the POWER and VOLUME DOWN buttons.
  • Press VOLUME DOWN to select FACTORY RESET, and then press the POWER button.
M8 Does Not Turn On
ProblemHello droid guys! I’m having problem in my HTC M8 one. The problem started today while I was charging it cos the battery was low. Then the phone went off. I tried putting it back on nothing then I started charging it again, there is a little orange light that turns on when i plugged it in to the charger but my phone doesn’t come on to indicate charging. I’ve tried everything to turn it back on (holding the volume up and volume down with power button several times) and nothing. And I just got this phone like less than 2months ago and no warranty to return it. HELP Thanks!
Solution: Try using another wall charger and charge your phone for at least 10 minutes. Press and hold the Power key and Volume Up key for 10 seconds and see if your phone responds. This is called a soft reset which does not delete your phone data.
If your phone still does not turn on then you may want to do a hard reset. Take note that this deletes any data that you may have stored in your phone. Proceed with the following steps if you already have a backup of your data.
  • Ensure that the device is powered off.
  • Press and hold the Volume Down button (located on the right edge) then press and hold the Power button (located on the top-left edge) until the HBOOT screen appears then release.
  • From the HBOOT screen, select FACTORY RESET.
  • Utilize the Volume Up/Down buttons to navigate through the available options and the Power button to select.
  • Allow several minutes for the reboot process to complete.
M8 Speakerphone Turns On Randomly During Calls
ProblemI have something my m8 is doing, when I have my Wi-Fi turned on and I’m talking to someone on the phone it likes to turn the speaker phone on randomly, when it does it doesn’t say its on but when it does I hit the speaker phone button n it turns off. I figured out that the majority of the time it does it is when my Wi-Fi is on, but I keep my Wi-Fi on pretty much all the time. It does do it occasionally when the Wi-Fi is off also, its a pain in the ass. Any suggestions?
Solution: Several owners of this device have also been experiencing this very issue. One solution that came up was to uninstall the latest update of Chrome since a bug in the app seems to turn on the speakerphone. This issue however was reported several months ago so any bug in the app may have been fixed by now.
What I suggest you do is to check for any new software updates available for your phone and install them. These updates have improvements and bug fixes that may help resolve the issue.
If your phone is already running on the latest software then try to do a factory reset. Update all your apps as soon as the factory reset has finished. Make sure to backup all your data first and turn off the Fast Boot opt ion before proceeding.
  • Ensure that the device is powered off.
  • Press and hold the Volume Down button (located on the right edge) then press and hold the Power button (located on the top-left edge) until the HBOOT screen appears then release.
  • From the HBOOT screen, select FACTORY RESET.
  • Utilize the Volume Up/Down buttons to navigate through the available options and the Power button to select.
  • Allow several minutes for the reboot process to complete.

How to stop a number calling your Samsung Galaxy S2

We all do stupid things when were hot headed and say things we probably shouldnt in the heat of the moment. Theres always a time where we want to avoid a call from someone when we know their about to call. Thanks to one one of the features of the Samsung Galaxy S2 you can "black list" numbers to prevent them from calling you.

To add a number to your black list you need to open the contacts page such as Scotts
shown to the right here and then press on the menu button on the handset. This will open up a small menu at the bottom of the screen with 6 options. The option you need to select is more then "Add to black list" when the option comes up.

When youve added the black list you will see a little blue sign next to the persons number (as seen next to Scotts number in this picture). If Scott now tries to call my Samsung Galaxy S2 hell just hear a dial tone as if my phone was switched off! Now I can avoid the ginger virgin with ease.

 To remove a number from black list you can follow this method but click on "Remove from black list" when you previously clicked on "Add to blacklist".


Although you stop the calls coming through you DO NOT prevent the number from sending you texts.

Fixing Samsung account session expired error message

Many Samsung users are familiar with Samsung account session expired pop up message, which prompts users to input password of their Samsung account. Once a month, you may be required to reinput your password as a security measure. But it can be a real nuisance if the error message appears on your task bar or comes out of nowhere while you are busy with other apps. One way to fix this Samsung account sessions expired error message is to disable cloud syncing. Here are the methods or possible solutions to get rid of the Samsung account login prompt:
This error is common for all Samsung smartphones or tablets running latest Android 6.0 Marshmallow or Android 7 Nougat operating systems. Example- Samsung Galaxy S7, S7 Edge, S6 Edge, Galaxy Tab A and so on.


How to remove Samsung account session expired message from notification window

How to fix Samsung account session expired message on notifications

Method 1: Disabling Auto sync

  1. Open your apps list and select "Settings" or just pull down your quick access menu from the top of the screen and tap on the "settings" (gear) icon. 
  2. Now go to "Cloud and accounts" 
  3. Select "accounts" >> select "Samsung account"
  4. Tap on the three dots icon on top right  >> ta p "sync all"
If the problem is still unresolved, go to Cloud and accounts >> tap on three dots icon >> select "disable auto sync"


Method 2: Cancelling sync 

  1. Go to device Settings like in above method. 
  2. Select "Accounts"  >> Tap "Samsung Account"
  3. Tap "Cancel sync"
Restart your smartphone and check if the Samsung account session expired error is gone. You may the message in the notification area. Simply tap on the message and reenter your Samsung account pa sswor.